Adding LED lights to your car is a great way to enhance its aesthetics, improve visibility, and boost safety. Whether you want to install ambient interior lighting for a sleek look, under glow lights for a bold statement, or high-powered LED light bars for off-road adventures, LED lighting offers energy efficiency and long-lasting performance.
Unlike traditional halogen lights, LEDs consume less power, produce brighter illumination, and come in various colors and designs to match your style. From interior footwell lights that create a cozy atmosphere to undercarriage lights that make your car stand out at night, LED lighting provides endless customization options.
However, proper installation is crucial to ensure safety and durability. In this guide, we’ll explore the different types of LED lights you can install in your car, and provide step-by-step instructions on how to connect led lights to car battery.
Understanding LED Lights and Power Requirements
Before diving into the installation process, it’s important to understand the types of LED lights available for your car and how to handle the electrical requirements.
Types of LED Lights for Cars
- Interior LED Strip Lights: These are typically used inside the car to illuminate footwells, dashboards, and other areas. They come in flexible strips that are easy to install and can change colors for added effect.
- Underglow LED Lights: Mounted under the car, these lights give your vehicle a striking glow at night. They’re often used to accentuate the car’s lines and add a bold visual element.
- LED Light Bars: These are high-powered lights typically mounted on the grille, bumper, or roof. They provide strong illumination and are often used for off-road driving or as auxiliary lights.
- Headlights and Fog Lights: LED headlights and fog lights improve visibility and give your car a modern, sleek look.
Voltage and Power Requirements
Car batteries supply 12V DC power, which is perfect for most LED lights. However, the total power consumption of your lights needs to be taken into account to avoid overloading your battery. Always check the LED manufacturer’s specifications to ensure that the lights are suitable for a 12V system.
To prevent potential damage, use the correct gauge wires and ensure proper fusing. Using wires that are too thin can lead to overheating, while improper fuses may not protect the system in case of a short circuit.
Tools and Materials Needed
Before you begin, gather the following tools and materials:
Essential Tools:
- Wire strippers
- Electrical tape
- Soldering iron
- Zip ties or mounting clips
- Multimeter
- Heat shrink tubing ns)
Required Materials:
- LED light strips or bars
- Inline fuse holder and fuse
- Toggle switch or relay
- Additional wires

Planning the LED Light Installation
Choosing the Mounting Location
Before starting the installation, decide where to place your LED lights. Placement will depend on the type of LED you’re installing:
- Exterior: Consider mounting the lights under the car (underglow), on the grille, on the wheel wells, or along the roof bars for light bars.
- Interior: Lights can be placed on the dashboard, under the seats, in the footwell, or in the trunk for a subtle effect.
Wiring Considerations
- Shorter Wires: Using shorter wires can minimize voltage drop, ensuring that your LED lights get enough power to shine brightly.
- Protection from Heat and Moisture: Make sure the wires are protected from heat sources or water exposure, particularly for exterior installations.
- Proper Grounding: Ensure that the negative wire is properly grounded to avoid electrical issues.
5 Easy Steps on How to Connect Led Lights to Car Battery
Installing LED lights in your car enhances visibility and adds a stylish touch. Follow these five essential steps to ensure a safe and effective installation.
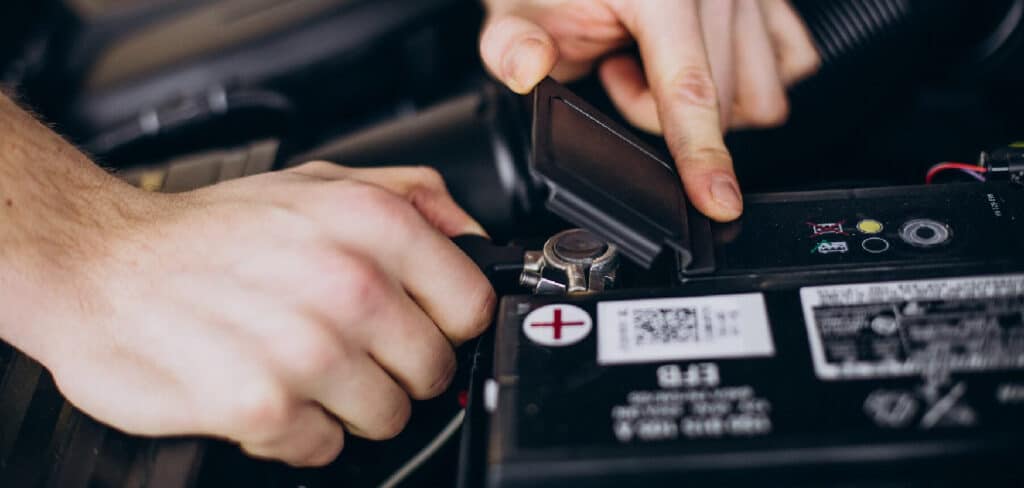
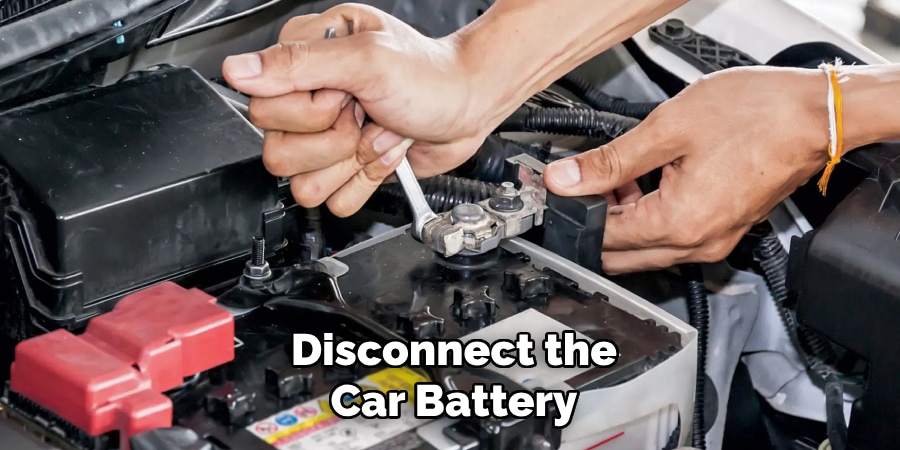
Step 1: Disconnect the Car Battery
The first and most crucial step is to disconnect the car battery to prevent electrical accidents or short circuits. Locate the battery, usually in the engine bay, trunk, or under a seat. Use a wrench to loosen the nut on the negative (-) terminal and carefully remove the cable.
This ensures that no electricity flows through the system while you work. For additional safety, you may also disconnect the positive (+) terminal, but it is not always necessary. Once the battery is safely disconnected, you can proceed with the installation without the risk of electrical hazards.
Step 2: Connect the LED Lights
Connecting the LED lights properly is essential for safe and efficient operation. If using a basic direct connection, attach the positive (red) wire from the LED lights to the battery’s positive (+) terminal and the negative (black) wire to the chassis ground or battery’s negative (-) terminal. If you prefer manual control, install a toggle switch between the battery and the LED lights, wiring one side of the switch to the battery’s positive wire and the other side to the LED light’s positive wire.
The negative wire should be grounded properly. For high-powered LED light bars, using a relay prevents battery overload. Connect the battery’s positive terminal to the relay input, then connect the relay output to the LED lights. A switch inside the car activates the relay, allowing controlled power flow. The negative wire should always be properly grounded.
Step 3: Add a Fuse for Protection
To protect the LED lights and the vehicle’s electrical system, adding a fuse is necessary. The fuse prevents short circuits and power surges that could damage the lights or other components. Choose a fuse that matches the LED lights’ power requirements, usually between 5A and 10A.
Install the fuse holder in line with the positive wire before it connects to the LED lights. Ensure that the fuse is easily accessible in case it needs to be replaced. If the fuse blows, it indicates an electrical overload, preventing further damage to the LED system. This step is crucial for maintaining the safety and longevity of the lights.
Step 4: Secure the Wires
Properly securing the wires prevents damage from heat, movement, or sharp edges. Route the wires away from moving engine parts, exhaust components, or suspension systems where they could get worn or cut. Use zip ties or adhesive mounting clips to neatly fasten the wires along the car’s frame or under panels.
If the wires pass through metal sections, use rubber grommets to protect them from wear and damage. Ensuring that all wiring is secure reduces the risk of malfunctions and keeps the installation neat and durable.
Step 5: Test and Reconnect the Battery
After completing the wiring, it is essential to test the LED lights before finalizing the installation. Double-check all connections to ensure they are secure and properly insulated. Turn on the lights and verify that they function as expected. If any issues arise, troubleshoot the connections and make necessary adjustments.
Once everything is confirmed to be working correctly, reconnect the battery by attaching the negative (-) terminal. Your LED lights are now successfully installed, providing enhanced lighting and a stylish look for your car.
Testing and Troubleshooting
Testing the LED Lights
Reconnect the battery, turn on the car, and flip the switch to check the LED lights. Ensure they’re lighting up as expected, and verify that they are bright and functional.
Common Issues and Fixes
- LEDs not turning on: Double-check your connections and fuse. Ensure there is no loose wiring or faulty fuse.
- Flickering lights: This may indicate loose wiring or low battery voltage. Tighten all connections and check the battery voltage.
- Blown fuse: If the fuse has blown, replace it with the correct amperage.
Safety Tips and Maintenance
- Avoid leaving your LED lights on for prolonged periods to prevent unnecessary battery drain.
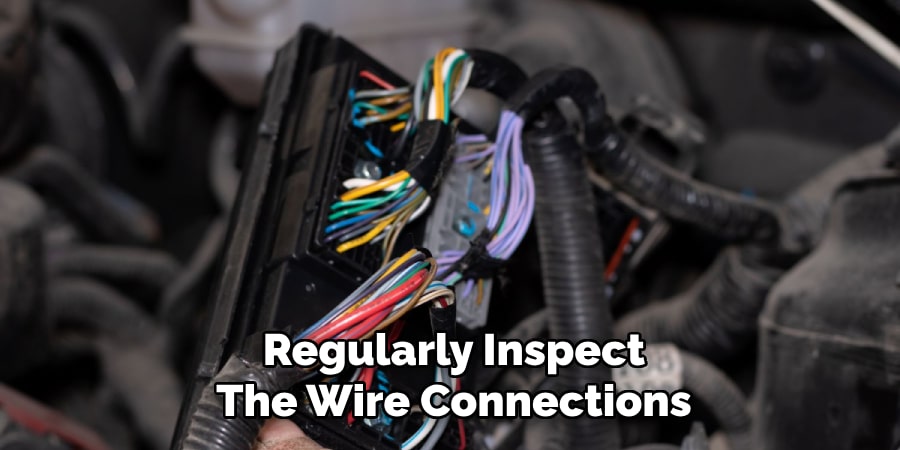
- Regularly inspect your connections for wear, corrosion, or damage to ensure the system remains safe and functional.
- Use waterproofing techniques for exterior LEDs, such as applying silicone sealant or using weatherproof covers.
Frequently Asked Questions
Q: Will LED lights drain my car battery?
Ans: LED lights consume very little power, but if left on for extended periods without the engine running, they can drain the battery. Using a switch or relay system can help prevent battery drain.
Q: What fuse size should I use for my LED lights?
Ans: The appropriate fuse size depends on the power requirements of your LEDs. Generally, a 5A–10A inline fuse is recommended to protect the circuit from electrical overload.
Q: Do I need a relay for LED light installation?
Ans: For small LED strips, a relay isn’t necessary. However, for high-power LED light bars, using a relay ensures safe operation and prevents excessive current draw from the battery.
Q: Can I use LED lights on both the interior and exterior of my car?
Ans: Yes, LED lights can be used inside the car (dashboard, footwell, trunk) and outside (under glow, grille, wheel wells). For exterior installations, ensure the LEDs are waterproof.
Q: Why are my LED lights flickering or not turning on?
Ans: Common causes include loose wiring, a blown fuse, or a weak battery. Double-check all connections and test the circuit with a multimeter.
Conclusion
Connecting LED lights to your car battery can significantly enhance your vehicle’s look and visibility. By following the step-by-step instructions in this guide, you can safely and effectively install LED lights, whether for the interior, exterior, or both. Always prioritize safety, use the correct tools and materials, and make sure your wiring is neat and secure.
With your new lighting setup, enjoy the transformed look of your car and the extra functionality that LED lights bring. Happy driving!