Outdoor lighting is a great way to enhance the beauty of your home while also improving safety. Whether it’s for the holiday season or year-round decoration, net lights provide an easy and efficient way to illuminate shrubs, giving your outdoor space a warm and inviting glow.
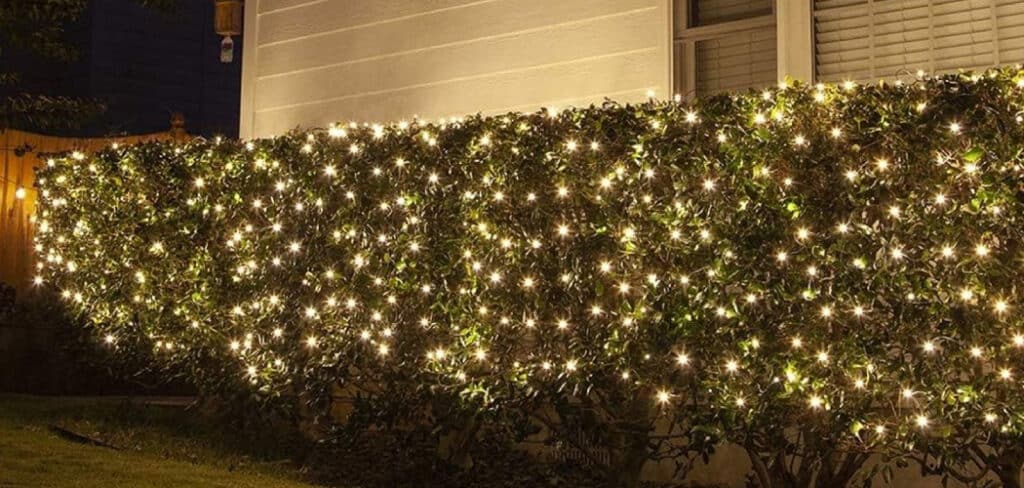
Unlike traditional string lights, net lights are designed in a grid pattern, making them perfect for draping evenly over bushes and small trees. This article provides a comprehensive guide on How to Put Net Lights on Shrubs effectively. Installing net lights may seem simple, but proper preparation and technique can make a big difference in achieving a polished and professional look.
From choosing the right type of lights to securing them properly, this guide will walk you through every step of the process. By following these steps, you can avoid common mistakes, ensure durability, and create a stunning outdoor lighting display with minimal effort.
Gathering Necessary Tools
- Extension cords
- Outdoor timers
- Clips or twist ties
- Garden stakes
- Ladder
- Electrical Tape
- Light
Safety Precautions
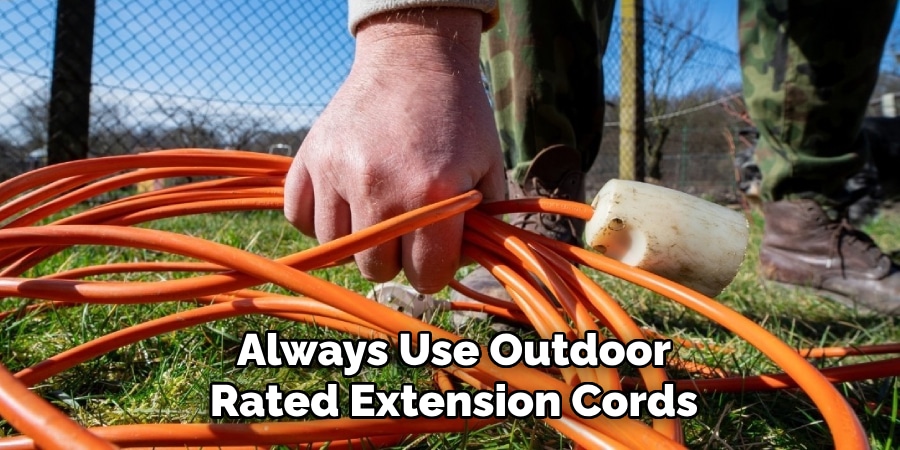
- Always use outdoor-rated extension cords to prevent electrical hazards.
- Avoid overloading circuits by checking the wattage of each light set.
- Keep wires off pathways to prevent tripping hazards.
Choosing the Right Net Lights
Before installing net lights on your shrubs, it’s essential to select the right type based on your needs. Here are a few factors to consider:
Types of Net Lights
- LED vs. Incandescent: LED net lights are energy-efficient, longer-lasting, and emit less heat, making them a safer choice for prolonged use. Incandescent lights, while cheaper, consume more electricity and have a shorter lifespan.
- Warm White vs. Multicolor: Warm white lights provide a classic, elegant glow, while multicolor lights create a festive and playful atmosphere. Choose based on your desired aesthetic.
Size Considerations
- Measure your shrubs to determine the size of net lights needed. Common sizes include 4×6 ft., 6×8 ft., and larger variations.
- Choosing the right size ensures full coverage without excessive overlapping or gaps.
Power Source Options
- Plug-in Net Lights: Best for permanent or large-scale setups, but they require an accessible power outlet.
- Battery-Powered Net Lights: Ideal for areas without nearby outlets, but battery life may be limited.
- Solar-Powered Net Lights: Eco-friendly and cost-effective, but effectiveness depends on sunlight availability.
Weather Resistance
- Ensure the lights are labeled “outdoor-rated” and waterproof (IP65 or higher) to withstand rain, snow, and extreme temperatures.
- Look for UV-resistant coatings to prevent fading over time.
Preparing for Installation
Proper preparation is key to a hassle-free installation.
Measuring Shrubs
- Use a measuring tape to determine the width and height of each shrub.
- Calculate the number of net light sets needed based on these measurements.
Testing Lights Before Installation
- Plug in or power on the lights to check for defects, burnt-out bulbs, or malfunctioning sections.
- This step prevents the need to reinstall or replace lights after setup.
5 Easy Steps on How to Put Net Lights on Shrubs
Installing net lights on shrubs is a simple yet effective way to enhance your outdoor space. Following these step-by-step instructions will help you achieve a clean and professional look while ensuring safety and durability.
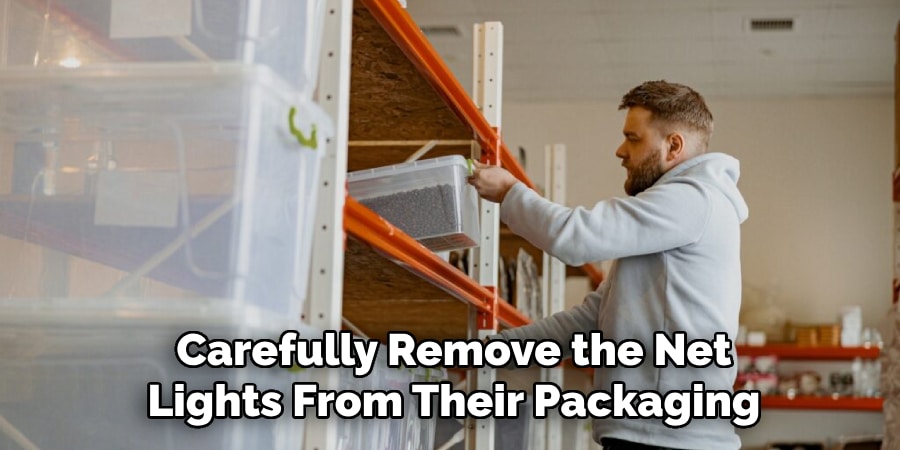
Step 1: Unpacking and Untangling the Net Lights
Before installation, it’s crucial to prepare the lights properly to avoid frustration later.
- Carefully remove the net lights from their packaging. Be gentle to prevent damaging any wires or bulbs.
- Lay the lights flat on the ground in an open space to inspect them. Check for tangled sections and slowly untangle them without pulling too hard.
- Inspect the netting pattern to ensure all bulbs are correctly positioned and none are missing or broken.
- Plug the lights in to test them before installation. This step helps identify any faulty sections before they’re placed on the shrubs.
Taking a few minutes to untangle and test the lights will save you time and effort during installation.
Step 2: Positioning the Lights Over the Shrubs
Placing the net lights correctly ensures a balanced and even illumination.
- Start from the top of the shrub and drape the net evenly over it. Let the lights naturally fall over the sides.
- Ensure full coverage by adjusting the position. Avoid excessive overlaps, as this can create uneven lighting.
- Check for gaps where the netting may not be reaching. If necessary, slightly adjust the placement to cover the entire shrub.
- Step back and evaluate the coverage. Make minor adjustments to ensure a neat and symmetrical look.
Proper positioning prevents uneven lighting and ensures a professional appearance.
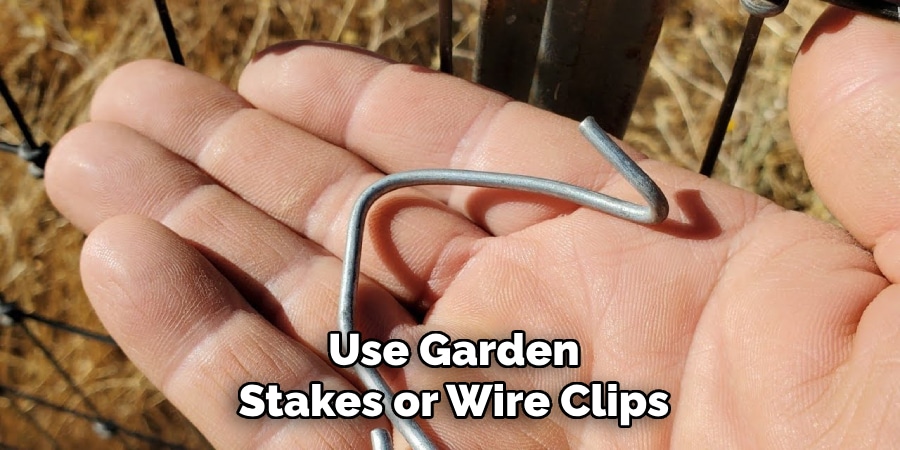
Step 3: Securing the Net Lights in Place
Securing the lights helps keep them in position, preventing movement due to wind or accidental bumps.
- Use garden stakes or twist ties to anchor the net lights to the shrub’s branches or base.
- Gently tighten the netting without stretching it too much to avoid damaging the wires.
- Adjust any loose areas to distribute the lights evenly across the shrub.
- Ensure stability by lightly shaking the shrub to check if the lights stay in place.
A well-secured net prevents the lights from shifting or falling off over time.
Step 4: Connecting Multiple Nets (If Needed)
For larger shrubs, you may need to use multiple net lights to achieve complete coverage.
- Lay the second net light slightly overlapping the first one to ensure a seamless transition between the sets.
- Use built-in connectors (if available) to link multiple sets together. This helps maintain a uniform lighting effect.
- Avoid overloading the circuit by checking the manufacturer’s instructions on how many sets can be connected in series.
- Distribute power evenly by using multiple outlets or an outdoor-rated power strip if necessary.
Connecting multiple nets correctly ensures that all sections of the shrub are illuminated without overloading your electrical system.
Step 5: Hiding Wires and Power Cords
Exposed wires can ruin the aesthetics of your lighting display and create tripping hazards.
- Run extension cords along the ground in areas where they are less visible.
- Use garden stakes or wire clips to secure the cords and prevent movement.
- Camouflage wires with mulch, bushes, or outdoor wire covers to blend them into the landscape.
- Ensure safety by keeping power connections away from water sources or footpaths.
By properly hiding the wires, you enhance both the beauty and safety of your lighting setup.
Enhancing the Display
Adding Additional Decorations
- Complement net lights with string lights, pathway lights, or decorative ornaments for a more festive look.
- Consider using color-changing lights for added visual interest.
Using Timers for Automation
- Set timers to turn lights on at dusk and off at dawn, ensuring efficiency and convenience.
Dimming or Blinking Effects
- Some net lights come with built-in settings for dimming, twinkling, or color transitions.
- Experiment with different modes to enhance the atmosphere.
Maintenance and Troubleshooting
Regular Inspections
- Check lights weekly for burnt-out bulbs or disconnected sections.
- Ensure all connections remain secure, especially after heavy winds or rain.
Replacing Faulty Bulbs
- Many LED net lights have replaceable bulbs; keep extra bulbs on hand.
- Follow manufacturer instructions for safe replacement.
Protecting Against Weather Damage
- Use weatherproof connectors to protect plugs from moisture.
- Avoid placing lights near standing water to prevent electrical issues.
Storing Lights Properly
- After the season, carefully remove lights and wrap them loosely to prevent tangling.
- Store them in a dry, temperature-controlled space.
Common Mistakes to Avoid
Choosing the Wrong Size of Net Lights
- Measure shrubs accurately before purchasing lights to prevent gaps or excessive overlaps.
Overloading Electrical Outlets
- Always check manufacturer recommendations for how many sets can be connected together.
Failing to Test Lights Before Installation
- Testing lights beforehand saves time and effort, preventing frustration during setup.
Not Securing the Lights Properly
- Without stakes or ties, lights can shift or fall, affecting the overall look.
Using Indoor-Rated Lights Outdoors
- Indoor lights are not designed for weather exposure and can lead to short circuits or burnouts.
Frequently Asked Questions
How many net lights do I need for my shrubs?
Ans: The number of net lights required depends on the size of your shrubs. Measure the width and height of your shrub and compare it to the dimensions of the net light. If needed, multiple nets can be connected for full coverage.

Can I leave net lights on my shrubs all year round?
Ans: Yes, but it’s best to use weatherproof, outdoor-rated net lights to withstand different seasons. However, prolonged exposure to extreme weather conditions may reduce their lifespan. Consider removing them after the holiday season for longevity.
Are net lights safe for outdoor use?
Ans: Most net lights are designed for outdoor use, but always check the product label to ensure they are waterproof and have an appropriate safety rating for outdoor environments. Use outdoor-rated extension cords and secure all connections to avoid hazards.
How do I prevent my net lights from tangling when storing them?
Ans: After removing the lights, lay them flat and fold them neatly, avoiding tight knots. Store them in a labeled storage bin or wrap them around a cardboard sheet to prevent tangling for next season.
Can I connect multiple net lights together?
Ans: Yes, but follow the manufacturer’s recommendations on the maximum number of sets that can be connected. Overloading the circuit can cause overheating or reduce the brightness of the lights. Use separate outlets if necessary to distribute power safely.
Conclusion
Installing net lights on shrubs is a simple yet effective way to enhance your outdoor space, whether for holidays, special events, or everyday ambiance. By choosing the right type of lights, preparing properly, and following a step-by-step installation process, you can create a stunning display that is both beautiful and functional.
Routine maintenance and careful storage ensure your net lights remain in excellent condition for years to come. By avoiding common mistakes and using creative enhancements, you can transform your shrubs into glowing focal points that elevate the charm of your outdoor area. Now that you have a complete guide, it’s time to light up your landscape with ease and confidence!