A properly functioning license plate light is essential for both safety and legal compliance. These small but crucial lights ensure your vehicle’s license plate remains visible at night, preventing fines and enhancing road safety. If your license plate light stops working, it may lead to citations, as most traffic laws require it to be illuminated.
There are several reasons why your license plate light may fail. Common causes include burnt-out bulbs, blown fuses, damaged wiring, or a faulty socket. Fortunately, fixing these issues is relatively straight forward and requires only basic tools and knowledge. In this guide, we will walk you through the process of how to fix license plate light wiring.
Tools and Materials Needed for Fixing License Plate Light Wiring
Before starting the repair, gather the necessary tools and materials:
Basic Tools
- Screwdriver set (Phillips and flathead)
- Multimeter (for testing voltage and continuity)
- Wire strippers and cutters
Repair Materials
- Electrical tape and heat shrink tubing
- Replacement bulbs and fuses
- Soldering iron (optional but recommended for secure connections)
- Dielectric grease (to prevent future corrosion)
- Zip ties (for organizing and securing wires)
Having these tools ready will make the repair process efficient and effective.
Safety Precautions
Before beginning, it’s important to follow some safety precautions:
- Always turn off your vehicle’s electrical system before working on wiring.
- Wear protective gloves and safety glasses.
- Use a multimeter to check voltage and continuity before replacing parts.
- Ensure proper insulation and sealing of any repaired wires to prevent future issues.

By following these steps, you can restore your license plate light’s functionality and avoid unnecessary trouble on the road.
Understanding License Plate Light Wiring
License plate lights are directly connected to your vehicle’s electrical system. Typically, they are powered through the same circuit as the taillights. This means that when you switch on your headlights, the license plate light should automatically illuminate.
Components of License Plate Light Wiring
The license plate light wiring consists of the following key components:
- Bulb: The light source that illuminates the license plate.
- Socket: Holds the bulb and connects it to the wiring.
- Wiring Harness: A set of electrical wires that connect the socket to the vehicle’s power source.
- Fuse: Protects the circuit from overcurrent or short circuits.
- Ground Wire: Completes the electrical circuit by providing a return path.
Signs of Faulty License Plate Light Wiring
- The light does not turn on even after replacing the bulb.
- The light flickers or works intermittently.
- The bulb burns out frequently.
- Corrosion or visible damage in the wiring or socket.
- Blown fuse related to the license plate light circuit.
Common Causes of License Plate Light Wiring Issues
1. Burnt-Out Bulb
The most common reason for a non-functioning license plate light is a burnt-out bulb. Over time, bulbs degrade and eventually stop working.
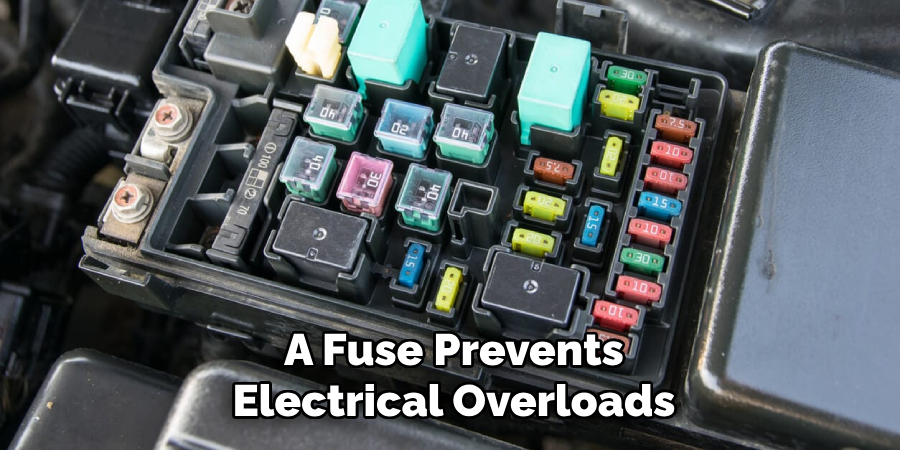
2. Blown Fuse
A fuse prevents electrical overloads. If the fuse responsible for the license plate light is blown, the circuit will break, and the light will not turn on.
3. Corroded or Damaged Wiring
Exposure to moisture, dirt, and road salt can lead to corrosion or damage in the wiring. Corroded or broken wires disrupt the electrical connection, preventing the light from working.
4. Loose or Disconnected Wiring
Vibrations from driving or minor accidents can cause wires to loosen or disconnect. A disconnected wire will prevent power from reaching the bulb.
5. Faulty Light Socket
A damaged or corroded socket can prevent the bulb from making a proper connection, leading to a non-functional light.
6. Poor Ground Connection
A faulty ground wire can cause inconsistent lighting or complete failure. If the ground connection is corroded or loose, electricity will not flow properly.
6 Easy Steps on How to Fix License Plate Light Wiring
A properly functioning license plate light is crucial for vehicle visibility and compliance with traffic laws. This guide will take you through a step-by-step process to diagnose and fix the issue efficiently.
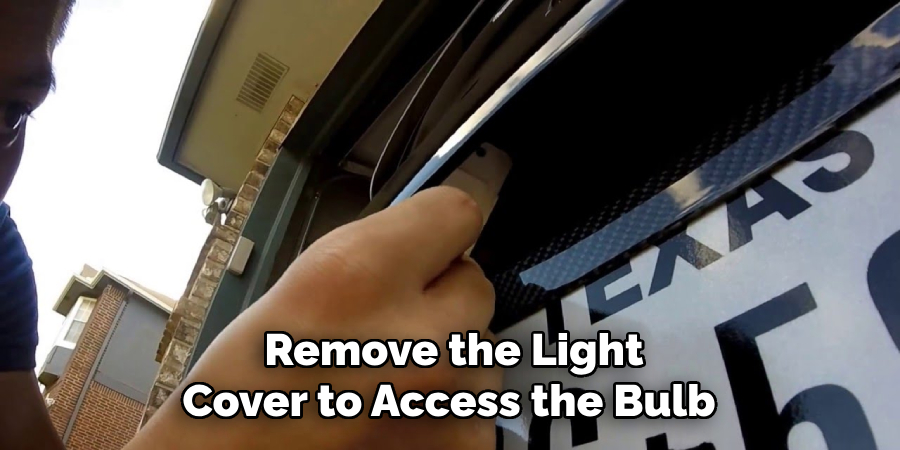
Step 1: Checking the Bulb and Replacing if Necessary
The first step in troubleshooting your license plate light is to inspect the bulb itself. Follow these steps:
- Locate the License Plate Light Housing: The license plate light is usually positioned near the rear bumper, either above or on the sides of the plate.
- Remove the Cover: Using a screwdriver, carefully unscrew and remove the light cover to access the bulb inside.
- Inspect the Bulb: Pull out the bulb and check for visible damage. A burnt-out filament, blackened glass, or a broken bulb indicates the need for replacement.
- Replace the Bulb: If the bulb is faulty, replace it with a new one of the same type and wattage. You can find this information in your vehicle’s manual or on the old bulb itself.
- Reinstall and Test: After inserting the new bulb, secure the cover back in place and turn on the lights to check if it works.
Step 2: Inspecting the Fuse Box
If the bulb is intact but the light does not work, the next step is to check the fuse. A blown fuse can prevent power from reaching the license plate light.
- Locate the Fuse Box: Consult your vehicle’s manual to find the fuse box. It is typically located under the dashboard, in the glove compartment, or in the engine bay.
- Identify the Correct Fuse: Look for the fuse corresponding to the license plate light circuit. The manual will specify its position and amperage rating.
- Check the Fuse: Remove the fuse using a fuse puller or pliers. Inspect it for a broken internal wire or blackened marks, indicating it is blown.
- Replace if Necessary: If the fuse is blown, replace it with one of the same amperage rating. Using a fuse with the wrong rating can cause electrical issues or damage.
- Test the Light: Turn on your vehicle’s lights and check if the license plate light is functioning correctly.
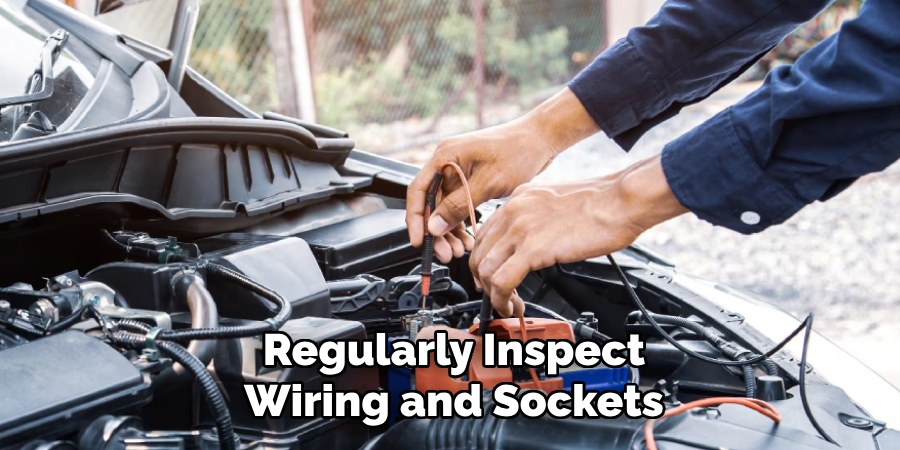
Step 3: Checking the Wiring for Damage
If replacing the fuse does not resolve the issue, there may be a problem with the wiring. A broken or corroded wire can interrupt the power supply to the light.
- Trace the Wiring: Follow the wiring from the light socket back to the power source.
- Look for Damage: Check for frayed, exposed, or disconnected wires. Pay close attention to areas where the wiring bends or connects to other components.
- Use a Multimeter: Set a multimeter to voltage mode and check if power is reaching the socket. If there is no voltage, there may be a break in the wiring.
- Identify Connection Issues: If the wires look intact but the light still does not work, check for loose or corroded connectors along the wiring path.
Step 4: Repairing or Replacing Damaged Wires
Once you identify damaged or broken wires, follow these steps to repair them:
- Cut Out the Affected Section: Using wire cutters, remove the damaged portion of the wire.
- Strip the Insulation: Strip about ½ inch of insulation from both ends of the remaining wire using a wire stripper.
- Connect the New Wire: Join the wires using either soldering or crimp connectors for a secure connection.
- Insulate the Connection: Cover the joint with heat shrink tubing or electrical tape to prevent exposure to moisture and corrosion.
- Apply Dielectric Grease: This helps protect the wiring from water and dirt, ensuring a longer lifespan.

Step 5: Ensuring Proper Ground Connection
A faulty ground connection can also cause the license plate light to stop working. Follow these steps to check and fix the ground:
- Locate the Ground Wire: The ground wire is usually connected to the vehicle’s metal frame near the light housing.
- Inspect for Corrosion: If the connection point is rusted or dirty, it may not conduct electricity properly.
- Clean the Ground Connection: Use sandpaper or a wire brush to remove rust and dirt from the grounding point.
- Secure the Connection: Reattach the ground wire tightly to a clean, unpainted metal surface.
- Test the Ground: Use a multimeter to check for proper continuity between the ground point and the vehicle’s chassis.
Step 6: Reassembling and Testing
Once all repairs are completed, reassemble the components and perform a final test.
- Secure All Wiring: Use zip ties or clips to keep the wiring organized and prevent loose connections.
- Reinstall the Light Cover: Ensure the light housing is properly secured to protect the bulb from damage.
- Turn on the Vehicle’s Lights: Activate the lights to confirm that the license plate light is now functioning.
- Double-Check Connections: If the light still does not work, go back through each step to recheck the fuse, wiring, and ground connections.
Preventative Maintenance Tips
- Regularly inspect wiring and sockets for damage or corrosion.
- Apply dielectric grease to protect connections from moisture.
- Use heat shrink tubing instead of just electrical tape for durable repairs.
- Check and replace fuses periodically if needed.
- Keep the license plate light housing clean and free from debris.
Performing these simple maintenance steps can prevent future issues and keep your vehicle compliant with traffic laws.
Frequently Asked Questions
Why is my license plate light not working?
Ans: A faulty license plate light could be due to a burned-out bulb, loose wiring, corroded connections, or a blown fuse. Checking these components can help diagnose the issue.
How do I check if the wiring is the problem?
Ans: Use a multimeter to test for continuity and voltage in the wiring. If there is no power reaching the bulb socket, the wiring may be damaged or disconnected.
Can I drive with a broken license plate light?
Ans: No, driving with a non-functional license plate light is illegal in most places and can result in a ticket. It’s important to fix it as soon as possible.
How do I fix a broken or frayed license plate light wire?
Ans: Cut out the damaged section, strip the ends of the wires, and reconnect them using heat shrink connectors or electrical tape. Ensure the connection is secure and insulated.
Can I replace the license plate light with an LED version?
Ans: Yes, you can replace your license plate light with an LED version for better brightness and longevity. Ensure the LED bulb is compatible with your vehicle’s electrical system to avoid flickering or errors.
Conclusion
A functional license plate light is a small but essential component of your vehicle’s lighting system. It ensures visibility, helps you avoid legal penalties, and contributes to road safety.
By following this guide, you can easily diagnose and repair wiring issues related to your license plate light. Whether it’s a burnt-out bulb, a blown fuse, or damaged wiring, these steps will help restore proper functionality.
Regular maintenance and inspections can prevent future failures, saving you time and hassle. If you encounter persistent issues despite making repairs, it may be best to consult a professional auto electrician.
Fixing your license plate light wiring is a straightforward task that improves both safety and compliance—so don’t wait until you get pulled over. Take action today!