Rock lights are small, durable LED lights installed underneath a vehicle to enhance visibility, particularly for off-roading adventures. These lights illuminate the ground beneath your Jeep, helping you navigate rocky trails, muddy terrains, and other challenging conditions in low-light environments. Jeep owners install rock lights for several reasons, including better nighttime visibility, improved safety, and an eye-catching aesthetic that sets their vehicle apart.

In this guide, we’ll provide a guide on how to install rock lights on a jeep effectively, covering everything from choosing the right rock lights to wiring them correctly for optimal performance and longevity. Beyond their functional benefits, rock lights add a custom look to your Jeep, making it stand out with a vibrant under glow. Whether you’re an off-road enthusiast who frequently tackles rugged trails or someone who enjoys personalizing their vehicle, rock lights can be a valuable addition. They come in various colors and can often be controlled via a smartphone app or remote, offering flexibility in customization.
Installing rock lights on a Jeep may seem complicated, but with the right tools and guidance, it’s a straightforward process that can be done at home. Follow along to transform your Jeep’s off-road experience with enhanced lighting and style.
Tools and Materials Needed
Essential Tools:
- Drill and drill bits
- Screwdriver set
- Zip ties
- Wire stripper/crimper
- Heat shrink tubing
- Electrical tape
- Multimeter
- Safety gloves and glasses
Required Materials:
- Rock light kit
- Mounting brackets (if needed)
- Extension wires (if necessary)
- Fuse and relay (for better power management)
Understanding Rock Lights and Their Benefits
What Are Rock Lights?
Rock lights are compact LED lights designed to be mounted underneath a Jeep. They illuminate the ground beneath the vehicle, helping drivers navigate dark or challenging terrains.
Benefits of Rock Lights
- Improved Off-Road Visibility: Essential for night-time or low-light off-roading conditions.
- Enhanced Aesthetic Appeal: Gives your Jeep a striking look with customizable lighting options.
- Increased Safety: Helps detect and avoid obstacles like rocks, logs, or potholes.
- Versatile Use: Suitable for various driving conditions, including mud, snow, and sand.
Types of Rock Lights
- Wired vs. Wireless: Wired rock lights offer stable performance, while wireless options provide easier installation.
- Single-Color vs. RGB (Multicolor): Single-color lights provide a simple glow, whereas RGB options allow customizable colors and effects.

Choosing the Right Placement for Rock Lights
Best Locations to Install Rock Lights:
- Wheel wells – Most common and effective placement.
- Underbody frame rails – Provides broad illumination.
- Front and rear bumpers – Enhances visibility in tight spots.
- Near suspension components – Useful for off-road adjustments.
Factors to Consider When Choosing Placement:
- Ensure maximum light coverage without unnecessary glare.
- Protect lights from mud, debris, and water exposure.
- Keep wiring hidden and secure to avoid damage.
Preparing for Installation
Safety Precautions:
- Disconnect the Jeep’s battery to prevent electrical hazards.
- Wear protective gear, including gloves and safety glasses.
Testing the Rock Lights Before Installation:
- Connect lights to a temporary power source.
- Ensure all lights work properly before mounting.
Planning the Wiring Route:
- Identify a clean and safe wiring path.
- Keep wires away from hot engine parts and moving components.
7 Easy Methods on How to Install Rock Lights on a Jeep
Rock lights are an excellent addition to any Jeep, enhancing visibility on off-road trails and adding a stylish touch. Installing them properly ensures durability and optimal performance. Follow this step-by-step guide to install rock lights on your Jeep effectively.
Method 1: Mounting the Rock Lights
Properly mounting the rock lights is essential to ensure they provide adequate illumination and withstand off-road conditions.

- Choose the Mounting Locations: Identify the best positions under the Jeep, typically near the wheel wells, undercarriage, or along the frame for optimal lighting coverage.
- Drill Holes if Necessary: If the provided mounting brackets require drilling, use a drill to create holes in the selected spots.
- Secure the Lights: Use the provided screws, bolts, or brackets to attach the rock lights firmly.
- Adjust the Positioning: Angle the lights to illuminate the necessary areas without excessive glare or shadowing.
Method 2: Running the Wiring
A clean and secure wiring setup prevents damage and ensures the lights function properly.
- Route the Wires: Guide the wiring along the vehicle’s frame, avoiding any areas with high heat, sharp edges, or moving parts.
- Secure with Zip Ties: Fasten the wires to the frame or other stable components using zip ties to prevent movement and potential wear.
- Check for Tension: Ensure that wires are neither stretched too tight nor loosely hanging, as both can lead to damage over time.
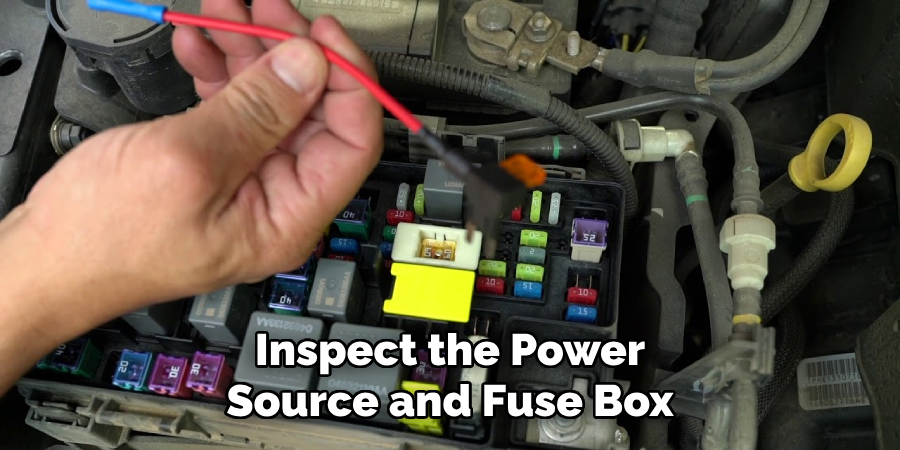
Method 3: Connecting the Rock Lights to Power
Connecting the rock lights properly to a power source ensures efficiency and safety.
- Choose a Power Source: You can either connect the lights directly to the Jeep’s battery for constant power or wire them to the fuse box for a controlled power supply.
- Use a Relay Switch: A relay switch enhances safety and control by preventing excessive power draw and protecting the electrical system.
- Splice and Connect Wires: Use heat shrink tubing to cover spliced wires, providing insulation and preventing exposure to moisture or debris.
- Double-Check Connections: Before moving to the next step, verify that all wiring is securely connected and properly insulated.
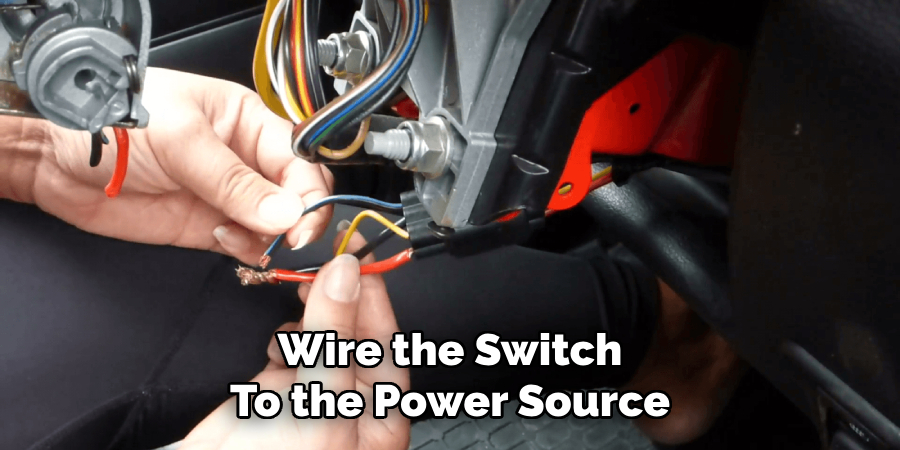
Method 4: Installing the Switch
A dedicated switch allows easy control of the rock lights without interfering with other electrical components.
- Select a Location: Choose a convenient place inside the Jeep, such as the dashboard or near the driver’s seat.
- Drill a Hole (If Required): If the chosen switch location requires installation, drill a small hole to accommodate the switch.
- Connect the Switch: Wire the switch to the power source, ensuring proper grounding to avoid electrical issues.
- Test the Switch: Before finalizing the setup, turn the switch on and off to confirm that the lights respond accordingly.
Method 5: Testing the Lights
Thorough testing ensures that the installation is successful and that all components work as expected.
- Reconnect the Battery: If you disconnected the Jeep’s battery during installation, reconnect it now.
- Turn on the Lights: Switch on the rock lights and verify that all units are working properly.
- Check for Issues: Look for flickering, dim lighting, or non-functioning units and address any wiring problems.
- Adjust as Needed: If certain lights are not positioned correctly, readjust their angles for better illumination.
Method 6: Troubleshooting Common Issues
If you encounter problems, use the following troubleshooting steps:
One or More Lights Not Working:
- Check wiring connections to ensure they are properly connected.
- Inspect the power source and make sure the battery or fuse box is supplying power.
- Examine fuses and relays to determine if any are blown or faulty.
Lights Flickering:
- Ensure that all ground connections are secure.
- Check for loose or damaged wiring and fix any visible issues.
- Test the power source to confirm it provides a steady flow of electricity.
Excessive Heat Near Wires:
- Use a thicker gauge wire if overheating occurs, as thin wires may struggle with high power loads.
- Keep wires away from engine components or heat sources to prevent insulation damage.
Method 7: Maintenance and Long-Term Care
Regular maintenance keeps the rock lights in good condition and extends their lifespan.
- Inspect Wiring Periodically: Look for any frayed or damaged wires that might cause malfunctions.
- Clean the Rock Lights: Dirt and debris can accumulate on the lights, reducing their brightness. Clean them regularly for optimal performance.
- Reapply Waterproofing: If necessary, use waterproof sealants or covers to protect electrical connections from moisture.
- Check Mounting Brackets: Ensure that the lights remain securely attached, especially after off-road trips.
By following these steps, you can successfully install rock lights on your Jeep, enhancing both aesthetics and functionality for off-road adventures. With proper installation and maintenance, these lights will provide reliable illumination for years to come.
Frequently Asked Questions
Are rock lights legal to use on public roads?
Ans: Rock light laws vary by state and country. While they are generally legal for off-road use, some areas prohibit their use on public roads, especially if they emit red or blue lights. Always check local regulations before installing and using them.
Do rock lights drain the Jeep’s battery?
Ans: Rock lights consume minimal power, but if left on for extended periods without the engine running, they can drain the battery. To prevent this, consider wiring them to a switch or using a dedicated power source like an auxiliary battery.
Can I install rock lights myself, or do I need a professional?
Ans: Installing rock lights is a DIY-friendly task that most Jeep owners can handle with basic tools. However, if you are unfamiliar with electrical wiring or drilling into your Jeep’s body, professional installation may be a safer option.
Are rock lights waterproof and durable for extreme conditions?
Ans: Most high-quality rock lights are designed to be waterproof, dustproof, and shock-resistant, making them suitable for off-roading. Always check the IP (Ingress Protection) rating to ensure they can withstand harsh environments.
How many rock lights do I need for my Jeep?
Ans: The number of rock lights depends on your lighting preference and coverage needs. A typical setup includes four to eight lights, with placements near each wheel well, undercarriage, and other key areas for maximum visibility.
Conclusion
Installing rock lights on your Jeep is a great way to enhance visibility, safety, and aesthetics. By following this step-by-step guide, you can ensure a smooth and efficient installation. Always prioritize safety and proper wiring to avoid electrical issues. With well-placed and well-maintained rock lights, your Jeep will be ready for any adventure, day or night. For those looking to take customization to the next level, consider adding remote-controlled lighting systems for ultimate convenience. Happy off-roading!