Fluorescent lights are widely used due to their energy efficiency, long lifespan, and bright illumination. Compared to incandescent bulbs, they consume significantly less electricity while providing extensive coverage, making them suitable for homes, offices, garages, and workshops.
Their affordability and durability further add to their appeal. However, proper wiring is crucial to ensure the safe and efficient operation of a fluorescent light fixture. Incorrect wiring can cause issues such as flickering, buzzing, reduced performance, or even pose serious fire hazards.
This guide will walk you through the essential components of a fluorescent fixture, the tools and materials needed, safety precautions to follow, and provides a comprehensive guide on how to wire a fluorescent light effectively.
Understanding Fluorescent Light Components
Fluorescent lights come in different types, each designed for specific purposes. T5, T8, and T12 tubes vary in size and efficiency, with T5 being the most energy-efficient, followed by T8 and T12. Compact Fluorescent Lamps (CFLs) are small, spiral-shaped bulbs that fit into standard sockets and are commonly used in homes and offices. Tube fluorescents, on the other hand, are long tubes designed for fixtures requiring broad lighting coverage, making them ideal for commercial spaces.
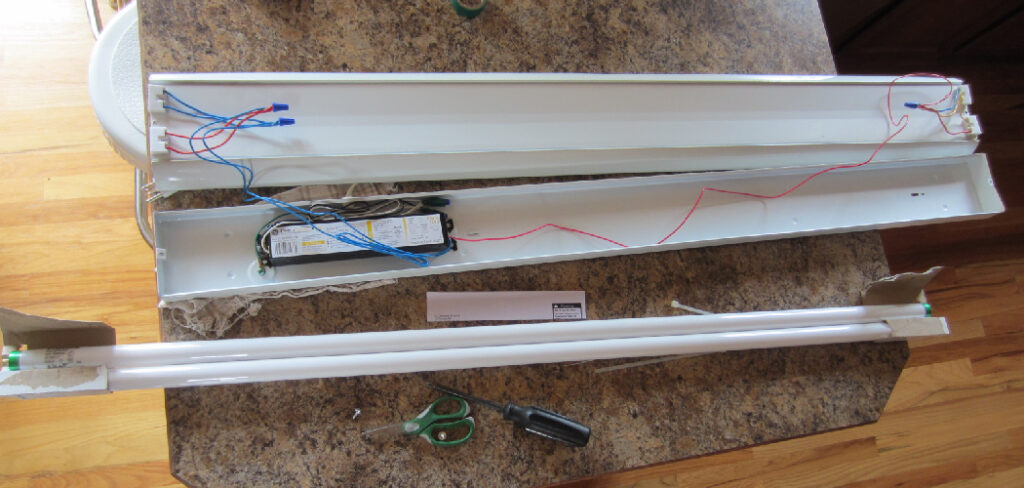
A fluorescent fixture consists of several key components. The tube is the primary light-emitting element. The ballast regulates electrical current to ensure stable operation, while the starter (found in older models) helps ignite the lamp. Sockets or holders secure the tube in place, and wiring connects the fixture to an electrical source. The reflector and housing direct light efficiently and protect the internal components, ensuring durability and optimal illumination.
Tools and Materials Required
Essential Tools
- Phillips and flathead screwdrivers
- Wire strippers and cutters
- Voltage tester or multimeter
- Electrical tape
- Drill
Required Materials
- Fluorescent light fixture
- Electrical wire
- Wire nuts and connectors
- Electrical box and conduit

Safety Precautions Before Wiring
- Turn off the power at the circuit breaker before starting.
- Use a voltage tester to confirm there are no live wires.
- Wear insulated gloves and safety goggles for protection.
- Check the electrical load to prevent overloading circuits.
- Follow local electrical codes for compliance and safety.
Choosing the Right Wiring Configuration
Choosing the right wiring configuration is crucial for the efficiency and functionality of lighting installations. Single fixture wiring is ideal for standalone setups, providing a straightforward and simple approach. For larger areas, multiple fixtures can be wired in series or parallel, ensuring an even distribution of light across the space. Additionally, integrating switch-controlled or motion-sensor wiring further enhances usability by allowing easier control and automation. Motion sensors, in particular, contribute to energy savings by turning lights on only when needed, offering both convenience and efficiency for modern lighting systems.
6 Easy Steps on How to Wire a Fluorescent Light
Wiring a fluorescent light fixture correctly is essential for safety and optimal performance. Below is a detailed step-by-step guide to ensure a proper and secure installation.
Step 1: Turn Off Power and Prepare the Wiring
Before beginning any electrical work, always shut off power at the circuit breaker to prevent the risk of electrocution. Use a voltage tester to confirm that no power is running to the wires before proceeding.
Next, prepare the electrical wiring by stripping about ½ inch of insulation from the ends of the wires using a wire stripper. This ensures proper conductivity when connecting the wires later. If replacing an old fixture, carefully remove it and inspect the wiring for any damage.
Step 2: Mounting the Fluorescent Fixture
Once the power is off and wiring is ready, mount the fluorescent fixture securely to the ceiling or wall. Position the fixture in the desired location and ensure it is level for even light distribution. Secure the fixture using screws and wall anchors if necessary, especially when mounting on drywall or other non-solid surfaces. Make sure the fixture is firmly attached and does not wobble, as loose installations can lead to operational issues or hazards.
Step 3: Connecting the Wires

Now, connect the electrical wires inside the fixture following standard wiring conventions. Identify the three main wires: black (hot wire), white (neutral wire), and green or bare copper (ground wire).
Connect the black wire from the power source to the black wire on the fixture, the white wire to the white wire, and the green or bare copper wire to the grounding screw inside the fixture. Secure each connection using wire nuts and wrap them with electrical tape for added safety. Ensure no exposed copper wire is visible outside the wire nuts to prevent short circuits.
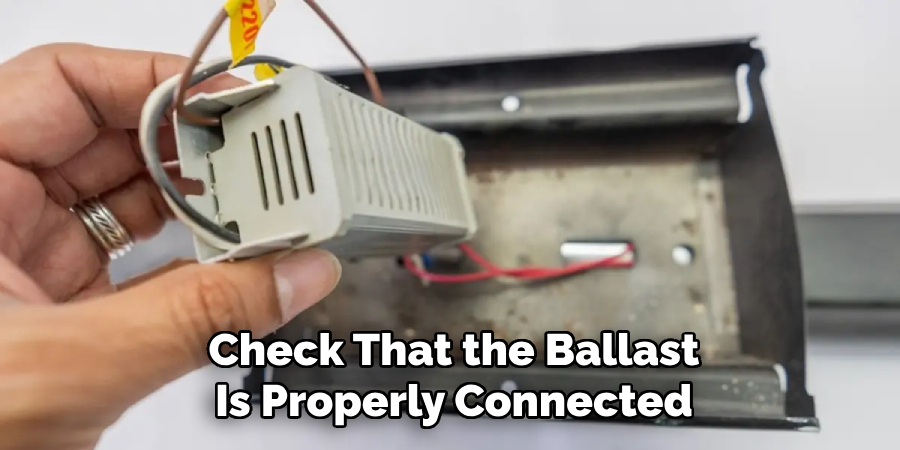
Step 4: Connecting the Ballast
A ballast regulates the voltage and current needed to start and operate fluorescent tubes. Modern electronic ballasts are preferred over older magnetic ones due to their efficiency and reduced humming noise. Identify the ballast type and refer to the wiring diagram printed on the ballast itself.
Connect the ballast wires to the corresponding fixture wires using wire nuts, following the color-coded guide on the ballast. Ensure all wires are tightly secured and neatly arranged to prevent short circuits or interference with the fixture cover.
Step 5: Installing the Fluorescent Tube
With the wiring completed, install the fluorescent tube into the fixture. Insert the tube’s metal pins into the socket slots on both ends of the fixture. Gently rotate the tube until it locks into place. A slight click should confirm proper placement. Avoid excessive force, as fluorescent tubes are fragile and can break if mishandled.
Step 6: Final Safety Checks
Before restoring power, perform a thorough safety check to ensure everything is properly installed. Inspect all connections to verify they are secure, with no loose or exposed wires. Check that the ballast is properly connected and positioned. Attach the fixture cover or diffuser if applicable to protect the tube and distribute light evenly.
Once everything is confirmed, restore power at the breaker and turn on the light switch. If the fixture does not illuminate immediately, double-check the wiring and tube placement.
By following these steps, you can successfully wire a fluorescent light fixture safely and efficiently. Proper installation ensures optimal performance, longevity, and energy savings.
Troubleshooting Common Wiring Issues
If your fluorescent light isn’t working properly, follow these troubleshooting steps to identify and fix the problem:
Light Won’t Turn On
Start by checking for loose or incorrect wiring connections. A miss wired fixture can prevent the light from functioning. If the wiring is intact, test the ballast using a multimeter and replace it if faulty. Additionally, ensure the fluorescent tube is properly seated in its sockets.
Light Flickers or Buzzes
Frequent flickering or buzzing could indicate a failing ballast or starter. Ensure the tube is securely connected, as a loose connection may cause intermittent operation.
Circuit Breaker Trips
A tripping breaker suggests a short circuit in the wiring. Inspect for exposed or damaged wires and verify that the wire gauge is appropriate for the fixture’s electrical load.
Maintenance Tips for Long-Term Performance
Proper maintenance is crucial for keeping your lighting fixtures efficient and long-lasting. Here are some essential tips:
Regular Cleaning: Over time, dust and debris accumulate on the fixture and tube, reducing brightness and efficiency. Wipe them down with a soft cloth or a mild cleaner to maintain optimal illumination.
Timely Tube Replacement: Fluorescent tubes should be replaced before they burn out to prevent strain on the ballast and ensure consistent lighting performance.
Check and Replace Ballasts: If you notice flickering, dimming, or buzzing noises, inspect the ballast and replace it if necessary.
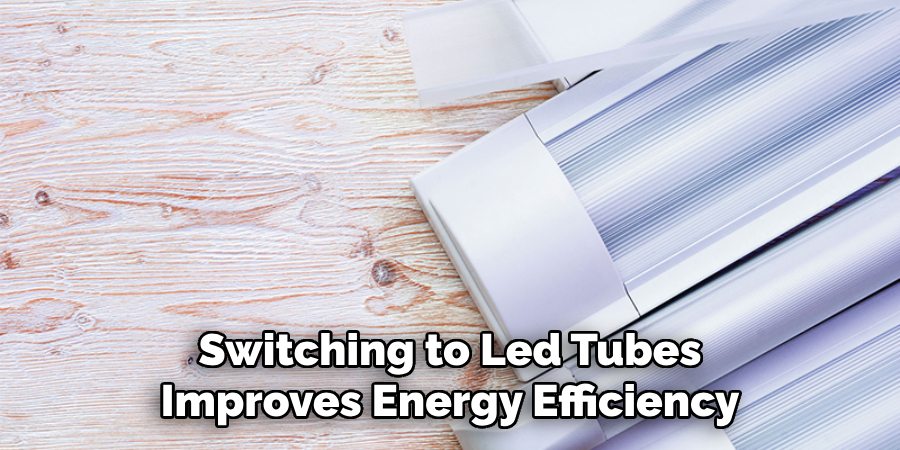
Upgrade to LED Tubes: Switching to LED tubes improves energy efficiency, reduces heat output, and minimizes maintenance costs while extending the fixture’s lifespan.
Frequently Asked Questions
Q: Can I wire a fluorescent light fixture without a ballast?
Ans: No, traditional fluorescent lights require a ballast to regulate the electrical current. However, if you’re using LED replacement tubes, you may be able to bypass the ballast.
Q: What gauge wire should I use for a fluorescent light fixture?
Ans: For most residential installations, a 14/2 gauge wire is recommended. For commercial or high-power applications, check local electrical codes.
Q: Why does my fluorescent light take a long time to turn on?
Ans: Older fixtures with magnetic ballasts or faulty starters can cause delayed ignition. Upgrading to an electronic ballast can solve this issue.
Q: Is it safe to install a fluorescent light fixture myself?
Ans: Yes, if you follow proper safety precautions, such as turning off the power, using insulated tools, and following local electrical codes. If unsure, consult a licensed electrician.
Q: Should I replace my fluorescent tubes with LED tubes?
Ans: Yes, LED tubes offer better energy efficiency, longer lifespan, and instant-on functionality compared to traditional fluorescent tubes.
Conclusion
Proper wiring of a fluorescent light fixture ensures safety, efficiency, and long-lasting performance. Following the correct installation steps and safety precautions prevents common electrical issues and ensures optimal lighting.
Regular maintenance and upgrades to modern LED technology can further enhance energy savings and reliability. If you encounter complex electrical problems, it’s always best to consult a professional electrician for assistance.
For more chandelier maintenance tips and lighting DIY guides, visit Lightorix.com!