Recessed lighting, also known as can lighting or downlighting, is a popular choice for modern homes due to its sleek, space-saving design and ability to provide even illumination.
Unlike bulky fixtures, recessed lights blend seamlessly into ceilings, enhancing both aesthetics and functionality. Wiring recessed lights to an existing switch adds convenience, improves energy efficiency, and enhances the overall look of your home.
However, it is crucial to follow safety precautions, including turning off the power before working with electrical components and adhering to local electrical codes to prevent hazards. This article provides a comprehensive guide on how to wire recessed lights to existing switch effectively.
Tools and Materials Required
Tools:
- Voltage tester
- Wire stripper
- Screwdriver
- Drill and hole saw
- Measuring tape
- Fish tape or wire puller
Materials:
- Recessed light fixtures
- Electrical wire
- Wire connectors
- Junction boxes
- Electrical tape
- Circuit breaker

8 Easy Steps on How to Wire Recessed Lights to Existing Switch
This process requires careful planning and adherence to electrical safety guidelines. Below is a detailed guide on how to wire recessed lights to an existing switch in eight easy steps.
Step 1: Plan the Layout and Ensure Compatibility
Before beginning the installation, take time to plan the lighting layout. Determine how many recessed lights you need based on room size and lighting goals. A common rule of thumb is to space the lights evenly, typically about 4 to 6 feet apart, ensuring uniform illumination without creating overly bright or dim areas. Next, check the compatibility of the existing switch and electrical circuit.
If the switch currently controls a single fixture, verify whether it has a neutral wire available for additional lights. Most home circuits can accommodate multiple recessed lights, but it’s essential to confirm that the additional load does not exceed the circuit’s capacity. Use a circuit tester to check for power flow at the switch before proceeding.
Step 2: Turn Off the Power and Prepare the Work Area
Safety is paramount when working with electricity. Locate the appropriate circuit breaker in your electrical panel and turn off the power to the switch and light fixture. Use a voltage tester to double-check that no power is running to the switch before touching any wires.
Once the power is off, clear the work area of any obstacles. If necessary, use a ladder to reach the ceiling safely. Wearing insulated gloves and safety glasses can further enhance protection while working on electrical components.
Step 3: Cut Holes for Recessed Lights
Using a recessed light template (usually provided by the manufacturer), mark the installation points on the ceiling. Be sure to position the lights away from ceiling joists, plumbing, or HVAC ducts. If needed, use a stud finder to locate joists and avoid potential obstructions.
Once the locations are marked and confirmed, use a hole saw or a drywall saw to cut the openings carefully. Ensure the cuts are clean and appropriately sized for the light housing to fit snugly.
Step 4: Run the Electrical Wiring
With the holes prepared, the next step is running the electrical wiring from the existing switch to the recessed lights. Start by determining the best path for the wiring. In some cases, you may need to drill small holes through ceiling joists to allow the wires to pass safely.

Use fish tape or a wire puller to guide the wires through walls and ceilings efficiently. Secure the wires with cable staples at appropriate intervals to prevent movement and accidental disconnections. Ensure all wires are rated for in-wall and ceiling installation to comply with electrical codes.
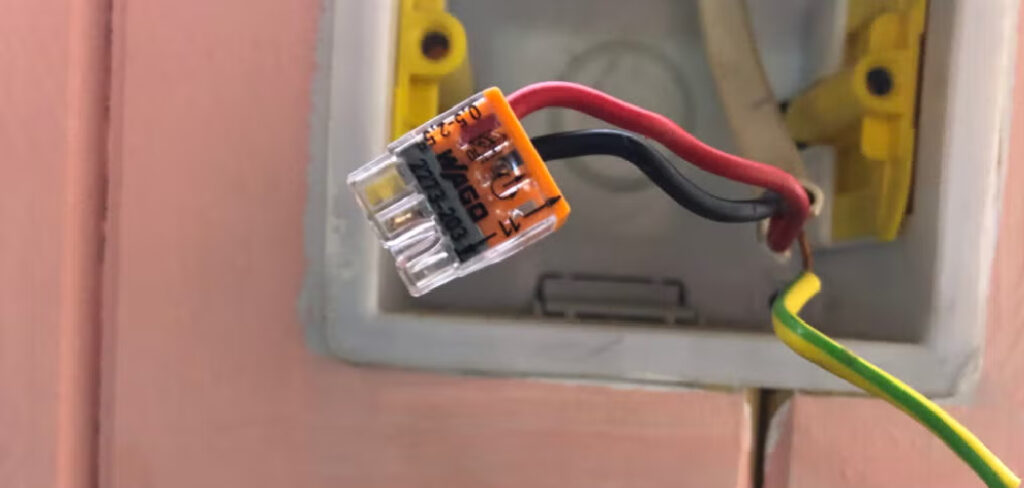
Step 5: Connect the Wires at the Existing Switch
Once the wires are in place, open the switch box and identify the wiring. The black wire (hot) connects to the switch terminal. The white wire (neutral) connects to the existing neutral wire. The bare or green wire (ground) attaches to the grounding terminal.
Use wire connectors to secure the connections firmly. It is also a good practice to wrap electrical tape around the wire nuts for extra security. After completing the connections, carefully push the wires back into the switch box and reattach the switch cover.
Step 6: Wire the Recessed Lights
For each recessed light fixture, make the necessary connections. Connect the black wire from the house wiring to the black fixture wire (hot connection). Connect the white wire from the house wiring to the white fixture wire (neutral connection). Attach the bare copper wire to the green fixture wire (ground connection).
Secure the connections with wire nuts and wrap them with electrical tape for added protection. Once the connections are secure, insert the recessed light housing into the cut openings. Follow the manufacturer’s instructions to fasten the fixtures properly.
Step 7: Install the Recessed Light Fixtures
After wiring each light, install the recessed light trims or covers according to the manufacturer’s instructions. If the fixtures are adjustable, position them for optimal lighting. Make sure all components, including the trim and housing, are properly aligned and secured to prevent any loose fittings or gaps.
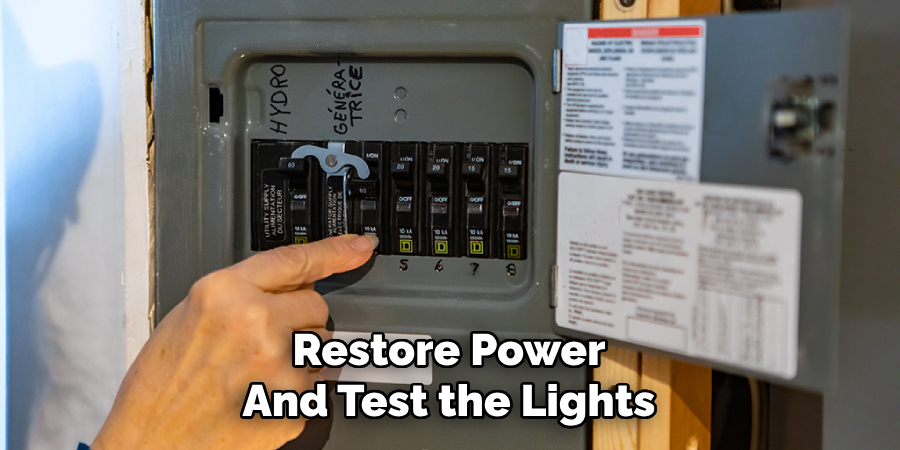
Step 8: Restore Power and Test the Lights
Once all the fixtures are installed, return to the electrical panel and switch the circuit breaker back on. Test the lights by toggling the switch on and off to ensure they function correctly.
If any of the lights do not turn on, flicker, or appear dim, check the wiring connections, verify that the bulbs are properly installed and compatible with the fixture, and ensure the circuit is not overloaded. If troubleshooting does not resolve the issue, consider consulting a licensed electrician to inspect the installation.
Safety Tips and Best Practices
- Always adhere to local electrical codes and safety regulations.
- If you are unsure about electrical work, consult a licensed electrician.
- Avoid overloading the circuit; calculate total wattage before adding new fixtures.
- Use fire-rated housings if installing recessed lights near insulation.
Common Mistakes to Avoid When Wiring Recessed Lights
Overloading the Circuit
One of the most common mistakes when wiring recessed lights is adding too many fixtures to a single circuit. Each circuit has a specific load capacity, and exceeding it can lead to tripped breakers, flickering lights, or even overheating, which increases the risk of electrical fires.
Before installing the lights, calculate the total wattage they will consume and compare it with the circuit’s maximum allowed capacity. A standard 15-amp circuit can typically handle about 1,800 watts, but it’s recommended to stay within 80% of the limit to ensure safety.
Incorrect Wiring Connections
Improper wiring is another major issue that can lead to electrical failures, short circuits, or even potential fire hazards. Loose connections, reversed polarity, or mismatched wire gauges can cause inconsistent performance or complete failure of the recessed lighting system.
Always ensure that black (hot), white (neutral), and green or bare (ground) wires are connected properly. Use wire nuts and electrical tape to secure the connections and prevent them from loosening over time.
Ignoring Electrical Code Requirements
Many homeowners neglect local electrical codes and safety regulations, which can result in failed inspections and unsafe installations. Always check your local building codes before starting the project, and obtain necessary permits if required.

Frequently Asked Questions
Q: Can I wire multiple recessed lights to an existing switch?
Ans: Yes, you can wire multiple recessed lights to a single switch as long as the circuit can handle the total wattage. You may need to install the lights in a parallel wiring configuration.
Q: Do I need a junction box for wiring recessed lights?
Ans: Some recessed light fixtures have built-in junction boxes, but if they don’t, you may need a separate junction box to safely connect the wiring.
Q: Can I use a dimmer switch with recessed lighting?
Ans: Yes, but ensure that both the switch and the recessed light bulbs are dimmable and compatible with each other to prevent flickering or buzzing.
Q: How many recessed lights can I safely connect to one switch?
Ans: This depends on the circuit’s capacity. For example, on a 15-amp circuit, you can typically connect up to 8–10 LED recessed lights (assuming each light uses around 10 watts).
Q: Can I install recessed lighting without attic access?
Ans: Yes, you can remodel recessed light housings, which are designed for installation without attic access by securing directly to the drywall.
Conclusion
Wiring recessed lights to an existing switch is a practical way to enhance your home’s ambiance, functionality, and modern appeal. This upgrade not only improves lighting efficiency but also adds a sleek, contemporary touch to any space.
Remember to turn off the power before working with electrical components, carefully follow wiring instructions, and test the lights before finalizing the installation. Double-checking all connections minimizes the risk of electrical issues, ensuring a long-lasting and reliable lighting solution.
If you encounter challenges or are unsure about any step, seeking professional assistance is always a wise choice to prevent potential hazards. With proper execution, your recessed lighting will provide enhanced illumination, energy efficiency, and a modern aesthetic, making your living space more comfortable and visually appealing.
For more detailed lighting guides and tips, visit Lightorix.com.